


The Critical Step Before Primer — Why Proper Surface Cleaning Makes All the Difference
“We are not here to sell you anything. But we are here to solve the problem of what to do with those ugly windows that don’t match anything anymore!”
There’s something incredibly satisfying about a freshly painted aluminium window — the way the light catches the smooth finish, the sharp masking lines, and the instant lift it gives to a home’s exterior. But what you don’t often see in those glossy after shots is the hard graft that happens before the first coat of primer is even applied.
In this post, we’re taking you behind the scenes on a real job in Mudgeeraba, where we’ve just finished prepping a full set of aluminium window frames for repainting. Specifically, we’re talking about the final wipe-down with wax and grease remover — a crucial step that too many painters skip or rush.
If you’re curious about how to get that flawless, long-lasting finish on your windows, or just want to know how the RepaintPro team tackles preparation the right way, this is the blog for you.
Welcome to Mudgeeraba — Where the Weather Demands Quality Prep
Mudgeeraba’s leafy streets, elevated homes, and proximity to the hinterland make it one of the Gold Coast’s most desirable places to live. But from a painting perspective, it throws a few unique challenges our way:
High UV exposure year-round Seasonal humidity and afternoon storms Dust and pollen from surrounding bushland Older homes with baked-on grime and oxidised surfaces
In other words — the perfect recipe for poor paint adhesion if you’re not meticulous with surface prep.
That’s why, before we even think about opening a can of primer, we go through a comprehensive preparation process that includes:
✅ Degreasing
✅ Sanding
✅ Dust removal
✅ Final wipe-down with wax and grease remover
Why Wiping with Wax and Grease Remover Matters
Once we’ve sanded every inch of the frame — often by hand and orbital sander — you might think the surface is good to go. But there’s a hidden danger: residual contamination.
Think:
Sunscreen smudges Airborne oils and garden sprays Handprints from installers or trades Mould spores Silicone overspray Even just atmospheric grime
These contaminants may not be visible, but if left on the surface, they can prevent your primer from bonding properly to the aluminium — which means you’re risking delamination down the track.
That’s why we always finish with a dedicated wipe-down using a high-grade wax and grease remover. It breaks down surface residues and leaves a chemically clean substrate, ready for maximum adhesion.
The Wipe-Down Process (How We Do It Right)
Our Mudgeeraba job involved 10 exterior aluminium windows — mostly sliding panels with existing faded powder-coated surfaces. The client wanted a full colour transformation to black gloss, replacing the tired yellow frames that were original to the 90s-built home.
Here’s how we handled the prep, with a spotlight on the wax and grease remover stage:
1. Initial Clean
We start by removing loose dirt, cobwebs, and bulk dust with soft brushes and a blower. This prevents contamination of our abrasive pads and ensures a clean work area.
2. Sanding
Next, we sand every part of the aluminium frame using:
Abrasive pads (non-woven) for profiles and curves Orbital sanders for flat sections Detail tools for tight corners
This abrades the surface and breaks through any oxidised or glossy powder-coat layers, creating a mechanical bond for primer.
3. Dust Removal
We blow down and vacuum the entire frame to remove sanding residue. Then we check visually for any missed spots or stubborn marks.
4. Wax and Grease Remover Wipe
This is where things get serious. We saturate clean, lint-free cloths with wax and grease remover and work methodically across the frame:
Top to bottom Inside and outside edges Behind rubber seals and in channels Around flyscreen tracks and mounting points
The key is to use a two-cloth system:
First cloth is wet and dissolves the contaminants Second cloth follows immediately to dry the surface and lift residue away
We go through multiple cloths per window to avoid spreading grime, and we always let the surface flash off completely before moving to primer.
The Science Behind It
Wax and grease removers are solvent blends formulated to:
Dissolve hydrocarbons (grease, oils) Break down silicones and waxes Lift stubborn surface film Evaporate cleanly without leaving residue
They’re also designed to be safe on aluminium and powder-coated surfaces, provided they’re used correctly. Unlike sugar soap or household cleaners, these removers won’t leave behind surfactants or film that interfere with paint.
If you’ve ever seen a job where the paint peeled off in sheets, it’s usually because this critical cleaning stage was skipped — or done poorly.
Why This Step Is So Often Skipped (And Why We Never Skip It)
Let’s be honest — surface prep isn’t glamorous. It’s time-consuming, physically demanding, and rarely gets the credit it deserves.
But this is the step that separates a quality job from a quick spray-over.
Some painters skip it to save time. Others rely on “all-in-one” products or use window cleaner instead of wax remover. We don’t cut corners like that — because we stand behind our finishes, and we’ve built a reputation around long-term results.
We’ve Revisited Jobs 8+ Years Later — Still Looking Great
Our clients often come back to us years after their project — not because something went wrong, but because they’re amazed at how good it still looks. That’s the power of:
✅ Proper surface cleaning
✅ Strong mechanical sanding
✅ Correct primer systems
✅ Multiple topcoats with proper film build
In fact, some of our oldest jobs in Mudgeeraba, Pacific Pines, and Mermaid Waters are holding up beautifully more than 8 years later.
A Quick Word About Colour Selection
For this Mudgeeraba home, the client chose Pearl White — a popular choice that looks bright and clean but does require extra prep due to the light pigment. For white, we always:
Use white primer rather than grey or black Apply extra topcoats to build proper coverage Maintain flawless cleanliness to prevent yellowing or bleed-through
White frames can show imperfections more easily, which is why prep is even more important when going lighter.
What Other Prep Happens Before Spraying?
Besides cleaning and sanding, we also:
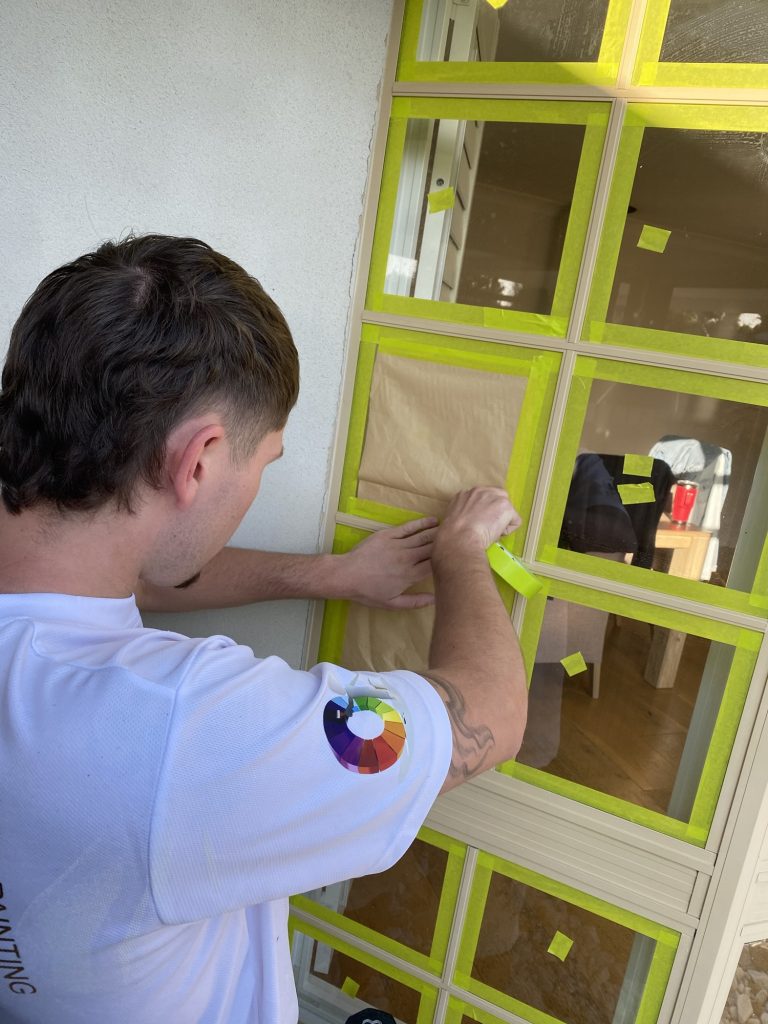
Mask every window edge with green tape Plastic-wrap the surrounding wall or render Use drop cloths and sheets to protect floors, gardens, and decking Carefully remove or lift blinds, curtains, and tracks Remove flyscreens and label for reinstallation
It’s a full system, and we approach every home with the same care we’d give our own.
What Do Homeowners in Mudgeeraba Need to Know?
If you live in Mudgeeraba and your windows look faded, yellowed, brown, or like they belong in another decade — we can help you bring your whole home into the modern era.
Repainting your aluminium frames is:
More affordable than replacing Less intrusive Faster Customisable to any colour Covered by a QBCC-backed 6-year workmanship warranty
And we do it all on-site — without removing your windows.
Common Questions from Clients
“Can I still open my windows after painting?”
Yes. After curing (usually 24 hours), all windows operate normally. We’ll guide you on when to open them.
“Do I need to be home?”
Not at all. You’re welcome to head out and we’ll take care of everything. If you are home, we’ll let you know when spraying is happening so you can avoid those rooms.
“How long will the job take?”
Most full-home projects in Mudgeeraba take about a week. Larger homes may take up to two weeks, especially if we’re doing interior frames or security screens as well.
“Can you repaint security or flyscreens too?”
Absolutely — and we can re-mesh flyscreens if needed.
Other Suburbs We Service Nearby
We’ve completed prep and painting work all over the Gold Coast, including:
Bonogin Reedy Creek Robina Varsity Lakes Worongary Clear Island Waters Tallai Pacific Pines Nerang Carrara
No matter where you’re located, if you have old aluminium windows, we can bring them back to life.
Final Thoughts — It All Comes Down to the Prep
You can have the best sprayer in the world, but if the surface isn’t clean, dry, and properly prepared — it’s all for nothing.
That’s why our wax and grease remover wipe-down is one of the most important parts of our process. It’s not flashy. You won’t see it on Instagram. But it’s what ensures:
Long-term adhesion Zero peeling No fish-eyes or primer issues That factory-smooth final finish
If you want your window frames to look new — and stay that way — start with a team that understands how to prep them properly.
“We are not here to sell you anything. But we are here to solve the problem of what to do with those ugly windows that don’t match anything anymore!”
???? This job was completed in Mudgeeraba — and we’re proud of the result.
???? Check out our work on Facebook and Instagram to see more behind-the-scenes and transformations.
???? Ready for a quote?
Send us a few photos of your windows — inside or out — and we’ll respond with a full quote including all prep, materials, GST, and the colour of your choice.
