


All my life I have grown up around paint. My dad was a painter and my grandfather was a painter. I’ve painted a few hundred homes over the years and I hope I can share some easy advice if your wanting to do it yourself. Painting a room is an easy, cheap do it yourself project that most people can tackle.

BEFORE ANYTHING DO YOUR PREP WORK FOR PAINTING
- Use filler for any holes or imperfections with top coat filler, wait for it to dry, and then lightly sand the patches. If you have a crack use a scraper to scrape it out so the filler has somewhere to adhere too. Around 5mm wide and deep should be enough for you to get the filler in there.
- Remove and erroneous matter, cracked paint, then sand the area smooth.
- Cleaning walls with sugar soap is always recommended especially in high wear areas.
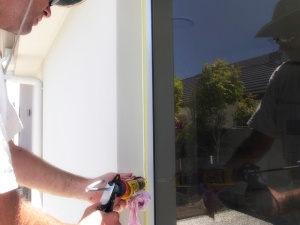
- Use no more gaps to fill any gaps between the walls and trim before painting the trim. Fill any dents in the timber with timber filler and wait to dry and sand smooth. Do not use any gyprock filler or no more gaps for this job.
- Always use a primer over any bare sub-straight. Timber or gyprock must be primed with the correct primer.
- Read manufactures directions on the can of paint. Don’t try to work from a full tin, purchase a plastic bucket to decant a small amount into to work from. Use a roller tray, usually 270mm tray is perfect size to fit your roller. If your using multiple colours during the day you can buy plastic inserts that fit into the tray so you don’t contaminate the next colour.
- If you want to use tape the best on the market is Frog tape and available from Masters stores.
Stuff you will need for Painting
- Try to have the following tools available as it will make your job so much easier if you have the right equipment: filler, putty knife, 120 grit sandpaper, and a damp lint-free rag. You will also need no more gaps (selleys) and putty if you’re working on the trim.
- Usual stuff we have when painting a room: Paint, a tool to open the paint can, stir stick, 25mm or 50mm paint brush, paint bucket, you can buy plastic ones from bunnings or masters., roller handle, roller cover around 10-15mm nap, roller tray, and a roller pole. Always use one it will save your back. Dropsheets for the floor, canvas is best and plastic sheets for furniture. Don’t use those stupid edging pads to cut in with, do it with a brush.
- A 5 in 1 tool is a painter’s best friend. You can use it open the paint can, open cracks in the wall for repair, spread filler and putty, scrape loose paint, and clean rollers.
- Use a good quality brush. I like a 75mm oval cutter from Monarch for most projects (painting trim, doors, cutting in), and a 50mm Monarch for windows.
- Use a good quality roller cover. I use a microfiber sleeve and around a 10mm nap for walls
CHOOSING PAINT, THEY ARE NOT ALL MADE EQUAL
- I’ve tried many brands and I’ve been happiest with Resene paints, although most top brands have their good and bad products. Don’t worry about finding a colour in Dulux but you want to use Taubmans paints, they all can match each others paint colours.
- Choose a finish that is appropriate for the room and application. I like semi-gloss for architraves, low sheen for wet areas like bathrooms and flat for all other rooms.
- Oil or Water based paints? I always use water based paint. It dries quickly, there are less fumes, and it cleans up with water. You can still choose latex if you are painting over oil paint, but you must prime first with an oil-based primer. You can test what kind of paint you have by rubbing it with a cotton ball soaked in rubbing alcohol. If the paint comes off, it’s water based paint.
- If your concerned about VOC’s then talk to your local paint shop and they will help you with low VOC paints


CHOOSING A PAINT COLOR
- Mistake after mistake gets made with people thinking too much into this process. Even small areas with different lighting can make a colour look totally different. If you are unsure, never ever use a test pot, they are a waste of time and will give you a false impression of how the room will look fully painted. If you are unsure get a colour consultant out to help you.
PAINTING TECHNIQUES
- Keep a wet edge, and always paint from dry to wet. This will minimize brush strokes and roller marks.
- Most DIY painters do not put enough paint on. If you hear a scratchiness coming from the brush it is too dry. Put a little more on.
- I never used to beleive in masking tape, however if you can get it off the roll straight and are careful with placing it where it needs to be, use tape. If not and you want to use a brush, start at a lower point than the cornice line and gradually work the brush closer and closer to the ceiling or trim.
- Watch a you tube video on how to hold a brush, this will give you a great starting point
- Painting a room is best accomplished by first cutting in (painting along the trim, ceiling, and corners) with a brush. After that has dried, you can go in with a roller for the walls.
- I find that it doesn’t matter whether you paint the walls or the trim first. My preference is to paint the trim first because I find that I can get a cleaner line when I cut in to paint the walls. If you like to tape off your edges, you may find it easier to paint the trim last.
- Wet your brush and then blot out most of the water before you begin. This will help to keep paint from creeping up into the ferrule (the metal part where the bristles are attached) and save your brush.
- Only dip your brush about a half or quarter of an inch into the paint, then wipe off one side on the edge of the paint container. This will help you avoid paint runs (from using too much) and keep your brush in good condition.
- When putting paint on, lay it off, don’t use short strokes Not doing so is one of the most common mistakes.
- When painting with a roller, place the fully laiden roller in the middle of the wall at your starting point, then work up and down only going about 1.5 roller widths per dip of paint. If you start at the bottom of the wall you can’t spread the paint over you wall from top to bottom. Always try to keep a wet edge and never, ever finish in the middle of a wall.
- When painting with a brush, don’t dab the paint on or move in a short back and forth motion. You can paint with the brush left and right (or up and down) to get the paint on, but then take one long finishing stroke from the dry side and tapering off into the wet edge.
- Always aim to use two coats of paint. It may look covered with only one coat but it is designed for a two coat system.
- Allow the maximum drying time. This will be on the can.


CLEANING UP
- Don’t worry about clean up with your rollers, place them in a shopping bag and remove all the air. They can stay wet for a couple of days this way. Same with a brush you can just use glad wrap to keep wet and Bristol straight.
- Microfiber rollers are only around $10 each so you can dispose of them instead of spending hours trying to clean them out.
- If you have used masking tape, most will have on the pack how long you can leave in place. It is always a good idea to remove when paint is dry. Dont leave it for days before removing.
- If you notice a paint drip I leave it until it has dried, trying to remove wet paint from carpet only spreads it everywhere. If you wait till it has dried you can carefully cut it off with a razor style blade.
- A good tip is to clean your brush every couple of hours or so. They tend to clog up in the stock and dont hold a nice shape for cutting in.
- Clean your brush with soap or laundry detergent. A quality brush can hold a lot of paint, so give the bristles a little squeeze to wring out the excess water when you’re done and make sure there is no more paint in the brush. When you have cleaned the brush make sure the bristles are nice and straight.
PAINTING A ROOM
To begin
- empty the room and lay out drop sheets
- do all of the prep we spoke about earlier
- Take out picture hooks and fill holes as you can always re do them later if you want.
- CMake sure you have a clean work surface.
- No more gap where required. Keep a pot of water and a rag to smooth gaps out and remove excess from frames.
- Apply tape if you not sure about cutting in. Remember don’t put tape on if your planning on painting next weekend.
PAINTING THE ROOM
- Make sure all your priming of bare surfaces is done first. Allow to dry and sand the primer
- Grab your roller and a roller cover, and pour your primer into a paint tray. Prime the walls. Remember 270mm roller with 10mm nap
- Paint your trim first. It is easier to cut the walls into the trim than the other way around. If your waiting for the room to dry to apply a second coat, place a canvas drop sheet over your paint gear and splash a little water over the canvas. This will keep the brush and roller wet for an hour or two.
- Always clean your brushes, but your roller you can just throw away if it’s a microfiber one. If you used masking tape, remove it as soon as the paint is dry to the touch.
- Wait for your paint to be completely dry before taping off again for the trim. Usually 24 hours
- Apply two coats of paint to the trim, letting the paint dry in between. You can wrap your brush in plastic or clean it while you wait for the first coat to dry, then clean everything up when you’re done.
- Again, if you used masking tape, remove it as soon as the paint is dry . If the paint begins to peel, score the edge lightly with a razor to avoid it pulling the other paint away.
- Clean up, put the room back together, and pat yourself on the back. You’re finished!
Sit back and enjoy.

If all this fails you can give us a call and we will come out to help of course.
Steve Lockyer
